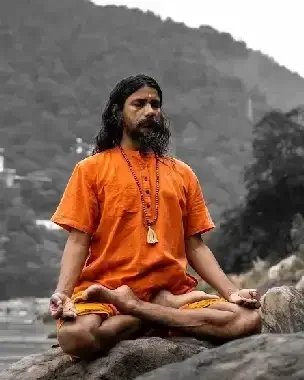
Padmasana Yoga stands as the ultimate and most recognizable symbol of the entire yoga practice because when you close your eyes and picture a yogi, you likely imagine them sitting in this specific and ancient shape. The legs are crossed and locked in a precise manner, the feet rest high on the upper thighs, the spine rises tall and straight towards the sky, and the hands rest peacefully on the knees in a gesture of calm. This posture is the padmasana pose, which is also widely known as the Lotus Pose, and it serves as the classic, traditional seat for deep meditation and pranayama, or breath control exercises.
This guide explains what Padmasana Lotus is in detail, and we will explore the detailed anatomy of the hips, the safest and most effective way to enter the pose, the extensive Padmasana benefits, and the various modifications that make it accessible to everyone. We will also look closely at Half Padmasana and how you can gradually prepare your body for the full expression of the Padmasana Lotus over time.
The Historical Significance of Padmasana
This pose appears in the very oldest yoga texts, including the Hatha Yoga Pradipika, which is a classic manual from the 15th century that lists Padmasana as one of the four most important asanas a student can practice. The ancient sages believed that this pose alone could destroy all diseases and claimed it had the power to awaken the dormant energy at the base of the spine, which is known as Kundalini. While we might view the phrase “destroying all diseases” as a metaphor today, the text highlights the incredibly high status of the pose within the tradition.

Key Factors About Padmasana Yoga (The Lotus Pose)
| Aspect | Details |
| Name | Padmasana (Sanskrit), Lotus Pose (English). |
| Primary Benefits | Opens the hips, stretches the ankles and knees, keeps the spine straight, and improves posture. |
| Mental Benefits | Calms the brain, increases attentiveness, and alleviates stress and anxiety. |
| Body Parts Involved | Hips, knees, ankles, thighs, pelvis, and spine. |
| Difficulty Level | Intermediate to Advanced. While it looks simple, it requires significant flexibility in the hips and knees to perform safely. |
| Best Time To Practice | Early morning on an empty stomach is best. It can also be practiced in the evening, provided you have not eaten for 3–4 hours. |
| Contraindications | Avoid it if you have recent or chronic knee or ankle injuries. |
| Duration | Beginners should hold for 30–60 seconds. Advanced practitioners can hold for 5–20 minutes during meditation. Note: Always switch the crossing of the legs to balance both sides. |
| Breathing | Long, slow, and deep diaphragmatic breathing. The chest should remain open to facilitate full lung capacity. |
| Common Mistakes | Forcing the knees down (which can damage ligaments), rounding the lower back, and not alternating the top leg. |
| Preparation Poses | Ardha Padmasana (Half Lotus), Baddha Konasana (Butterfly Pose), Janu Sirsasana (Head-to-Knee Pose), and Pigeon Pose (to open hips). |
| Follow-Up Poses | Matsyasana (Fish Pose) is the traditional counter-pose. Adho Mukha Svanasana (Downward Dog) or Dandasana (Staff Pose) help release blood flow to the legs. |
Step-by-Step Process: How to Do Padmasana?
We will break down how to do padmasana with precision, so please follow these steps slowly and listen to your body at every stage.
1. Getting Ready: Start by sitting on your yoga mat, your legs stretched out before you in Dandasana, or Staff Pose. Put your hands on the floor next to your hips, press down, and lift your chest, reaching your spine up toward the sky. Flex your feet and take a few deep breaths to settle in.
2. Cradle the Right Leg: Bend your right knee and draw your right foot toward your chest. Hold the knee with your right arm and the foot with your left arm.
3. The First Leg: Hold your right foot with both hands and rotate the right thigh outward from the hip socket. Place the right foot high up on the left thigh, bringing the heel as close to your lower belly as possible. The sole of your foot should face the sky, and you should let your right knee drop heavily toward the floor.
Check Point: Does your right knee hurt? If yes, stop here and do not proceed. If not, continue to the next step.
4. The Second Leg: Now bend your left knee, turn the left thigh outward, and lean back slightly to create space for the leg to move. Lift the left foot up and carefully bring it over the right shin, placing the left foot high on the right thigh. Bring the heel close to your belly so that the sole of the foot faces the sky, locking the legs together.
5. The Seat: Press both knees toward the floor, although if they do not touch the floor immediately, that is perfectly okay. Press your sitting bones down into the mat to ground yourself, lift your chest, roll your shoulders back and down, and relax your jaw.
6. Hand Placement (Mudras): Rest your hands on your knees with the palms open to the sky to represent receptivity. Alternatively, you can touch the tip of the thumb to the tip of the index finger in a gesture called Chin Mudra or Gyan Mudra, which represents the union of individual consciousness with universal consciousness.
7. The Gaze (Drishti): Soften your eyes and look at a point on the floor about four feet in front of you to keep your focus steady. Or, close your eyes completely and turn your gaze inward to the space between your eyebrows.
8. The Exit: To come out of the pose, you must move slowly and mindfully. Lift the top leg first, which is the left leg, and place it on the floor. Then release the bottom leg, which is the right leg, and stretch both legs out in front of you. Shake them gently to release the tension, and remember that it is traditional to switch sides, so next time bring the left leg in first, then the right.

Benefits Of Padmasana (Lotus Pose)
People strive to master Padmasana Yoga because the rewards are significant and the Padmasana benefits affect the physical structure, the nervous system, and the subtle energy body in multiple ways.
What Happens to Your Body When You Practice Padmasana:
- Enhances Mental Clarity: It helps you think more clearly and make better decisions in your daily life.
- Helps You Control Your Feelings: It helps you deal with mood swings and stay calm and in charge when things get hard.
- Promotes Mind-Body Awareness: It helps you be aware of your body, how you breathe, and how you feel all day long.
- Reduces Fatigue And Mental Exhaustion: It calms your nerves, gives you back your mental strength, and makes you feel less stressed and burned out. This makes you feel less tired in your mind and body.
- Supports Stress Management: It helps you deal with stress by keeping stress hormones in check and making you feel more relaxed and calm over time.
- Improves Mindfulness: Mindfulness is better because it keeps you in the moment, which makes you more aware of what you’re doing, thinking, and feeling.
- Boosts Positive Mood: It helps the brain release chemicals that make you feel good, which is good for your mental and emotional health.
- Improves Concentration: It helps you stay on task, pay attention longer, and focus more deeply.
Anatomy: Hips vs. Knees
You must understand the mechanical workings of your body to practice Padmasana Yoga safely, and this is the most critical part of this guide because ignorance here leads to injury.
- The Hip Joint: The hip is a ball-and-socket joint, which means it is designed to move in many directions, including flexion, extension, and rotation. Padmasana Lotus pose requires extreme external rotation, meaning the thigh bone, or femur, must turn outward deeply inside the hip socket. If your hips are open and flexible, the knee follows the direction of the thigh bone safely and without strain.
- The Knee Joint: The knee is a hinge joint, which means it is designed to open and close like a door to create flexion and extension. It is not designed to rotate or twist sideways, and it has very little capacity for lateral movement.
- The Danger Zone: This is where many students get hurt because if your hips are tight, the thigh bone stops turning before it has gone far enough for the pose. However, because you want to get into the pose, you might pull your foot up with your hands to force it onto the thigh. Since the hip has stopped moving, the force travels down to the next available joint, which is the knee. The knee twists sideways, putting massive strain on the delicate meniscus and the collateral ligaments.
- The Golden Rule: If you feel any sensation in your knee whatsoever, you must stop immediately because knee pain is never a “good stretch.” It is a warning signal from your body that you are moving the joint in a dangerous way. You must focus on opening the hips first, and when the hips open fully, the knees will naturally rest on the floor without pain. Never force the foot into the groin if the knee complains.

Important Preparatory Poses
Most people cannot jump straight into Lotus Padmasana, so you need to open the hips first by practicing these poses daily.
1. Baddha Konasana (Bound Angle Pose): Sit with your legs straight, then bend your knees and bring the soles of your feet together, letting your knees drop open to the sides. Hold your feet with your hands and sit tall, as this pose stretches the inner thighs and groin and mimics the external rotation needed for Lotus.
2. Janu Sirsasana (Head-to-Knee Pose): Sit with legs extended, then bend the right knee and place the foot against the inner left thigh, letting the right knee drop to the floor. Fold forward over the straight left leg to stretch the hips and hamstrings, which is a safer way to practice external rotation.
3. Eka Pada Rajakapotasana (Pigeon Pose): This is a deep hip opener where, from Downward Dog, you bring your right knee forward behind your right wrist and angle your right shin across the mat. Extend your left leg straight back and lower your hips toward the floor to target the outer hip and glutes, creating the flexibility needed to rotate the thigh bone.
4. Cradle the Baby: As described in the steps above, cradling the leg is the best dynamic stretch. Sit up tall, hold your shin parallel to the floor, and rock it back and forth, trying to bring the shin closer to your chest without rounding your back.

Variations and Modifications
Padmasana yoga is not an “all or nothing” pose because there are many stages, and you can get the same padmasana benefits from simpler versions.
1. Ardha Padmasana (Half Lotus)
This is the most common modification and is perfect for beginners who are working on their flexibility.
- How To Do It: Follow the steps for the full pose, but stop after the first leg by placing your right foot high on the left thigh and leaving your left foot on the floor tucked under the right knee.
- Why It Works: It opens one hip at a time, puts significantly less pressure on the knees, and allows you to sit with a straight spine.
- Tip: Remember to switch sides by doing the right leg on top for five minutes, then switching to the left leg on top to keep your hips balanced.
2. Sukhasana (Easy Pose)
This is a simple cross-legged seat where you cross your shins and let your feet rest on the floor under the opposite knees.
Modification: Sit on a folded blanket or a firm cushion to lift your hips higher than your knees, which helps the pelvis tilt forward and takes the strain off the lower back. This is often the best choice for long meditation sessions if your hips are tight.
Using Props: Props are your friends because they make the pose accessible and safe for everyone.
- Under the Knees: If you are in padmasana pose or half padmasana and your knees float in the air, put a block or folded blanket under them. This gives the legs a floor to rest on, which allows the inner thighs to relax, because if the knees hang in the air, the groin muscles grip and tense up.
- Under the Hips: Almost everyone benefits from sitting on a cushion because it elevates the hips, reduces the angle of flexion required, and creates space in the hip joint.
Common Mistakes and Safety
Watch out for these common errors because avoiding them will save your knees from injury.
- The Sickled Ankle: When you pull the foot onto the thigh, do not let the ankle roll so that the outer ankle bone digs into the thigh. The sole of the foot should point up, not sideways, so keep the ankle straight and strong to protect the ankle ligaments.
- Rounding the Spine: The goal is to sit up straight, but if your hips are tight, your lower back will round, and you will slump forward, compressing the chest and lungs.
- The Fix: Sit on a block or switch to half padmasana lotus because you should always prioritize a straight spine over locked legs.
- Forcing the Knees Down: Never push your knees down with your hands because gravity will do the work over time. Pushing them down creates torque in the knee joint, so let them relax down naturally as your hips open.
- Ignoring Pain: We will say it again because it is vital: knee pain is a red light, so stop immediately. There is no benefit to pushing through sharp pain in the knee because you risk tearing the meniscus.
Who Should Avoid Padmasana
Padmasana Yoga is not for everyone, and you should avoid this pose if you have a recent or chronic knee injury, ankle instability, or very tight hips or sciatica. Pregnant women in later stages should also restrict the hold time or use Easy Pose because circulation to the legs is important.
The Role of Mudras and Bandhas
To get the full Padmasana benefits, you can add other yogic techniques to the pose.
1. Mudras (Hand Gestures): We mentioned Gyan Mudra, where the thumb and index finger touch to connect you to wisdom. You can also place the left hand in your lap with the palm up and the right hand on top of it in a gesture called Dhyana Mudra, which is the mudra of meditation that creates a closed loop of energy.
2. Bandhas (Energy Locks): Since the spine is straight, you can practice Bandhas to control energy flow.
- Mula Bandha (Root Lock): Gently engage the pelvic floor muscles to seal the energy at the base of the spine.
- Jalandhara Bandha (Throat Lock): Lower your chin slightly toward your chest to lengthen the back of the neck and control the flow of energy to the head.
Padmasana in Daily Life
You do not need to be in a yoga studio to practice padmasana lotus, because you can integrate hip opening into your daily life.
- Sit on the Floor: When you watch TV or read, sit on the floor instead of the couch and sit in half padmasana to open your hips.
- Stretch at Work: If you sit in a chair, cross one ankle over the opposite knee in a seated Figure 4 stretch to open the outer hip.
- Patience: Remember that opening the hips takes years, not weeks, because the connective tissue in the hips is thick and strong and changes slowly, so do not get frustrated, but enjoy the process.
Conclusion
Padmasana lotus is the jewel of yoga poses because it represents the perfect balance of effort and ease, where the legs are rooted like the earth, the spine is airy like the wind, and the mind is clear like the sky.
It is a journey, not a destination, and you might spend years practicing half padmasana before your knee touches the floor, but that is perfectly fine. Yoga is in the practice, not in the final shape, and the goal is not to tie your legs in a knot but to find a seat where your body is comfortable and your mind is quiet. We invite you to deepen your understanding of these ancient techniques because correct alignment is hard to find alone.
Join us at Bali Yoga Retreats, where our experienced teachers will check your form and help you find the modifications in your form that suit you. You can learn deeply at our 200 Hour Yoga Teacher Training in Bali, where we teach you anatomy, safety, and the philosophy behind the poses, so start your journey to a mindful body and mind today!